New Garritan Installers


New Garritan InstallersWe are currently in the process of updating the software used to install Garritan sample libraries. The updates don’t impact the sounds of the instruments in any waythey only improve the process of placing the software on your computer.

The updates address two main issues: Mac compatibility and Finale integration.

Mac Compatibility

First and foremost, the new Garritan installers work consistently on the latest Mac operating systems. Earlier installers would work intermittently (or not at all) on recent versions of macOS.

Finale Integration

As part of the installation process, the new installers will now look to see if Finale has been installed on your computer. If it is, all pertinent Garritan support files will be installed in the correct folders. Upon restarting your computer, your new Garritan sounds will automatically be accessible from within Finale. This Garritan/Finale integration process previously involved several manual steps which were found in the Garritan Knowledge Base.

What Else Was Fixed?

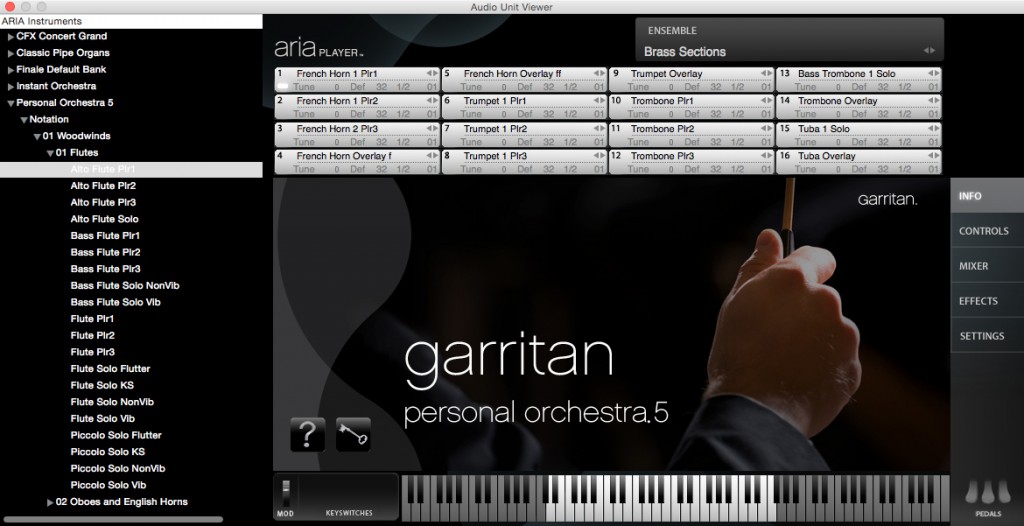
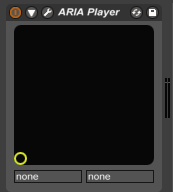
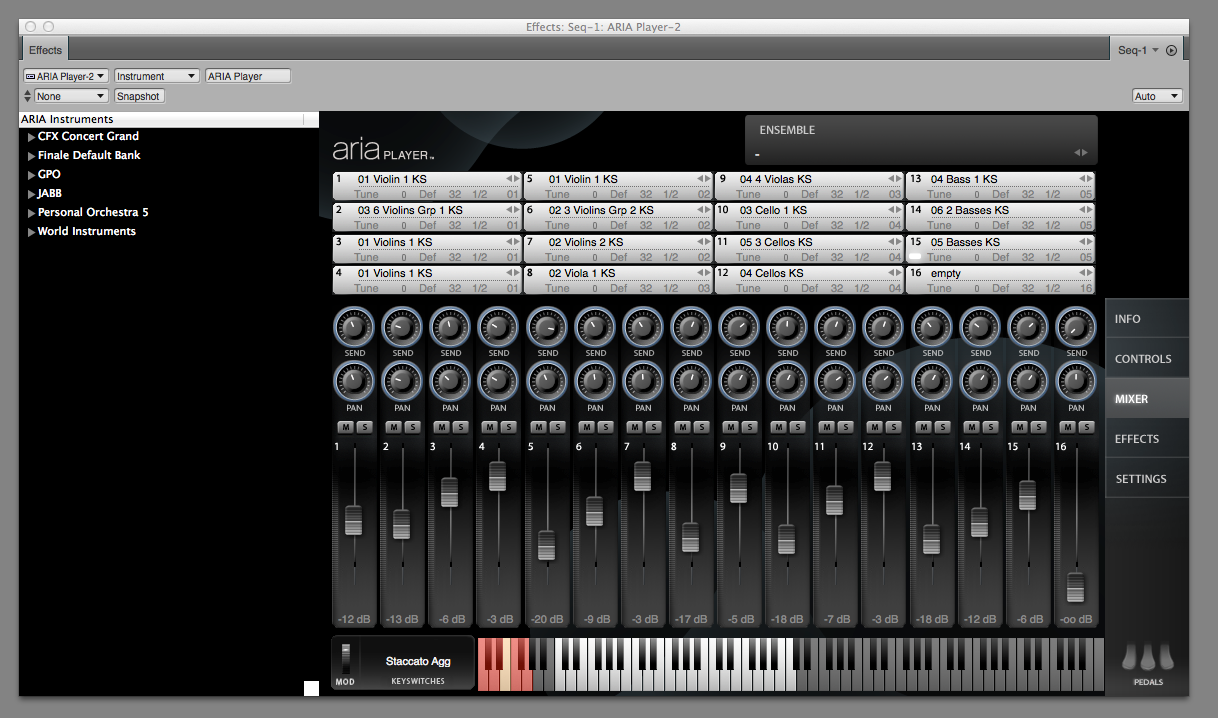
Besides the two issues above, the installers will also install an updated version of the ARIA Player. One highlight of this update is the introduction of a tree view (seen at left in the screenshot above), making it easier to load virtual instrument sounds.

Finally, the installers also update the Garritan end user license agreements (which can be very helpful, especially if you struggle with insomnia).

What Libraries Have Been Updated?

So far we’ve updated Garritan Personal Orchestra 5, Instant Orchestra, and Jazz and Big Band 3. Next up will be World Instruments and Concert and Marching Band 2, with Classic Pipe Organs and Harps after that.

Should I Care?

If your Garritan libraries are already installed on your computer, and everything is working well, including your integration with Finale (if applicable), then these updates are likely of little interest to you. If you’ve yet to use Finale and Garritan together, or are about to install a Garritan library on a new Mac, this is the good stuff and we’re glad to be able to share it with you.

Okay, I Care; What Do I Do?

To get the new installers, simply visit garritan.com, click on MY ACCOUNT, and login. This will bring you the My Account page, with the My Software tab selected. From here you can choose to download any Garritan library you’ve purchased.

Jon TschiggfrieJon Tschiggfrie’s title is product manager, audio/notation at MakeMusic. As such he helps guide daily development work on products ranging from Garritan libraries to Finale.

He hails from the exotic paradise that is eastern Iowa and thus understandably finds the Front Range of the Rockies (visible from the MakeMusic offices) to be “okay, I guess, if you’re into that kind of thing.”

We’re Not Joking: Garritan Libraries Are on Sale


We're Not Joking: Garritan Libraries Are on Sale

It’s no joke, Garritan libraries are on sale.

Now through April 7th, most Garritan sound libraries are 50% off. Take advantage of our foolishness! Add new sounds to your studio at our lowest prices ever:

Instant Orchestra $180 $90
Personal Orchestra $150 $75
Jazz + Big Band $150 $75
World Instruments $150 $75
Classic Pipe Organs $100 $50
Harps $100 $50

To save, enter promo code NOFOOLIN18 at checkout.

SHOP GARRITAN

But don’t fool around! This offer expires 11:59 PM MDT, April 7, 2018.
Offer excludes CFX and CFX Lite and is valid in the US only.

Garritan Products and macOS High Sierra


Garritan Products and macOS High Sierra


Last week Apple released the new macOS, High Sierra (10.13). A few issues have popped up for Garritan products on computers running the new OS.

Garritan Installer Issues in macOS High Sierra

With the exception of Abbey Road Studios CFX Lite, the installers included with all current Garritan products can hang during install on High Sierra. This problem began intermittently in earlier macOS versions. While the installation goes smoothly for some users, we’ve observed that the hanging behavior has become more prevalent with the latest release. Due to the intermittent nature of this issue, some users have had success simply starting the installation over again.

We are actively testing a solution for this problem, which involves building new installers for each product. We’ve already updated Garritan Instruments for Finale, the sample library included with Finale; this was included in our most recent Finale installer just last week. The next installer will be an update to Personal Orchestra 5, followed by all other products currently available at garritan.com.

Note that if you have already installed Garritan products on your Mac prior to upgrading to High Sierra, you will not experience these installer issues.

Standalone CFX Player

While the CFX library works fine with the ARIA Player in High Sierra, the standalone CFX Player (typically used for live performance) crashes if you open the Preferences dialog and then close it. We’re actively looking into this issue as well. More details can be found in this knowledge base article, which will be updated as we learn more.

Problems with Logic and GarageBand

Due to a change in the underlying architecture of macOS components, many Audio Units plug-ins no longer function correctly within Apple products such as Logic and GarageBand running on High Sierra. This includes all Garritan products. Specifically, the ARIA Player and the CFX Player plug-ins may not appear as available plug-ins in these hosts or may produce error messages.

This issue is not unique to Garritan (it seems fairly pervasive); it will require many manufacturers to update their plug-ins, and may take us a little longer to sort out.

What You Can Do Today

To be clear, with the possible exception of the installer issue, these problems only impact people running the latest macOS. If you are not using High Sierra yet, you can avoid these problems by postponing the update. In the meantime, rest assured: we’re on it.

Jon TschiggfrieJon Tschiggfrie joined MakeMusic’s Customer Success team in 2011 and today is the product manager for audio/notation, which includes all Garritan products. Jon’s focus is on discovering what users of virtual instruments really want to accomplish and on envisioning the improved solutions that might actually help people make that kind of progress.

Using Garritan Sounds in Ableton Live 9


Using Garritan Sounds in Ableton Live 9

If you own a Garritan sound library (including the one that comes with Finale), and are new to Ableton Live 9, this post is for you. We’ll share some tips to help you get started in Live with the ARIA Player you have, regardless of whether you own Live or are using the free trial. In addition to getting everything set up for use, we’ll also address a little more advanced workflow with some ideas for routing.

1. Activating VST/AU Plugins

If you’ve used a DAW before, your plugins are likely already active for you. You will, however,  need to enable your plugins inside Live 9 before you get started.

NOTE: The screenshots below were taken on a Mac. Don’t fear, Windows users, everything will be mostly in the same place. Also, I’ve changed the color of the software (kind of a cool feature in Live) so don’t be put off if Live looks a little different on your machine.

On Mac, go to Live > Preferences. Click on the File Folder, and then turn on Audio Units. You might turn on the other options if you have other VST plug-ins. Again, Windows will look a little different (you’ll want to go to Options > Preferences), but this is the general idea. 

Using-Garritan-Sounds-in-Ableton-Live-B

2. Selecting the ARIA Player

Now that Live has the ability to use 3rd-party plug-ins, it’s time to use them.

If you don’t already have a MIDI track created inside Live, you’ll need to create one.

Go to Create > Insert MIDI Track. If you’re used to a more traditional DAW view, select the Arrangement View. To do so, click the button with three horizontal lines, like this: 

Using-Garritan-Sounds-in-Ableton-Live-C

This is what a track looks like in Arrangement View: 

Using-Garritan-Sounds-in-Ableton-Live-D
To load the ARIA Player, select this newly created MIDI track (to do so, you can click just about anywhere), then look to the left side of Live. Under categories, select Plug-ins, then in the Garritan folder, select the ARIA Player. 

Using-Garritan-Sounds-in-Ableton-Live-E

Your MIDI track will automatically rename itself to your selected plug-in. You’ll notice the ARIA Player has come on screen, and there is now an ARIA Player box in the lower left corner of the screen – as seen below:

Using-Garritan-Sounds-in-Ableton-Live-F

TIP: If, like me, you inadvertently close the ARIA Player, and want to reopen it, click the wrench icon on the box above.

Now that the ARIA Player is loaded, it’s time to load your instruments and rout them.

3. Routing ARIA Channels into Live

If you’ve used other DAWs like ProTools or Logic, you may have noticed that the ARIA Player offers several variations of output configurations (Mono, Stereo, and few different Multi-Output options). In Live, the only option available is Multi-Output 16 Stereo. Having a Multi-Output Plug-in is helpful for saving computer power —  it makes more efficient use of resources than it would to load 16 different ARIA Players.

Within the ARIA Player, all sound is routed to outputs 1 and 2 by default. You can change this by clicking on the “1/2″ setting on each channel. In this example, I’ll be routing 4 stereo outputs.

Using-Garritan-Sounds-in-Ableton-Live-G

Right now, the Flute is coming out from 1 and 2, the Tuba is coming out from 3 and 4, the Violin is coming out from 5 and 6, and the Shakuhachi is coming out from 7 and 8.

Now, how do we create new tracks for the tuba, violin, and shakuhachi? Luckily, Live is pretty smart and this process is easy. Start by creating three new audio tracks (Create > Insert Audio Track).

On the first of these three new audio tracks, select the “Ext. In” input and select 1- ARIA Player. You’ll notice the output sets itself to “Post Mixer.” Select 3/4 ARIA Player. (Your MIDI track with the ARIA Player automatically uses output 1/2).

On the next audio track, select the same input, 1- ARIA Player, and use the next stereo output, 5/6 ARIA Player. Continue this process and always select the next output. My results look like this:

4. Routing MIDI from Live 9 into the ARIA Player

Multiple outputs are great, but they don’t do you any good if you’re not using multiple inputs. You’ll want to send MIDI from Live into the ARIA Player. Again, Live is pretty smart, so this will be an easy process. In this example, I’ll show how to set up 4 inputs.

The good news is, you already have the first input ready go from the setup in step 2. Next, we’ll create 3 MIDI tracks to set up your additional inputs. (Create > Insert MIDI Track)

By default, a new MIDI track will look like this:

Using-Garritan-Sounds-in-Ableton-Live-I

Below the In | Auto | Off section is our area of focus. Select “No Output” and select 1-ARIA Player. You’ll notice the box below has switched to “Track In”. Select “Track In” and select 2-ARIA Player. For the Next MIDI track, set “No Output” to 1-ARIA Player again, but set “Track In” to 3-ARIA Player. Continue this process and select the next ARIA Player input.

When ‘m done it looks like this:

Using-Garritan-Sounds-in-Ableton-Live-J

Now you’ve successfully routed your MIDI ins and audio outs, so you are up and running with Garritan Sounds in Live. Please let us know how it’s working for you via Facebook or Twitter.

Nick Morris is part of the MakeMusic Customer Success team, originally from Minnesota and now relocated to Colorado. He graduated from McNally Smith College of Music, receiving his B.S. in Music Production.

Nick enjoys finding new music to listen to and designing sound patches in his free time.

Garritan Update: August 2017


Garritan Update: August 2017

When Gary Garritan released the original Personal Orchestra in 2004, he set a lofty goal: to “bring the power and majesty of the orchestra to every musician.” Over the ensuing 12 years, the delivery of further sample librarieseach an achievement in its own right continually reinforced the Garritan name as synonymous with “simplicity, sanity, and affordability.”

And here’s some great news: our work is just beginning.

My Journey with Garritan

I recently took on the role of Product Manager, Audio/Notation, placing me in the driver’s seat for all things Garritan. It would be an intriguing challenge for anyone. I have to admit that I’m particularly thrilled to have been entrusted with the Garritan legacy. I began at MakeMusic as a customer success representative. My initial roles were to troubleshoot notation issues for our Finale customers and assist students and teachers in using SmartMusic. In early 2012, shortly after MakeMusic acquired the Garritan Corporation, I was among those chosen to provide Garritan support. In addition to answering phone and email inquiries, we also spearheaded the creation of an online knowledge base.

As we developed this resource, my product knowledge and appreciation for Garritan libraries’ capabilities deepened.  When a tech writer position for SmartMusic and Garritan became available, I was again chosen for the role.

My first project was to collect sources in order to produce the PDF manual for Garritan Harps. This was a real eye-opener into how sample library development worked. A few years later I was doing QA testing and contributing to the Personal Orchestra 5 documentation including our first online-only user manual. Today online manuals are ubiquitous, but at the time it was exciting to be able to continually improve the manual and provide users with the most up-to-date help resources.

On the Horizon

Today, I’m delighted to concentrate my focus on the virtual instrument world. I’m eager to play a role in the next generation of Garritan development. In the short term, we’re focused on leveraging our vast archive of samples to provide a consistent, low-impact playback experience across the entire MakeMusic ecosystem. We’ve got all these great sounds: it’s time we put them to good use.

Concurrently, we are also exploring possibilities for new libraries as well as making significant improvements to existing ones. We have no shortage of great ideas, from which we want to prioritize by what will best serve our customers. For example, should we extend the palettes of libraries like World Instruments and GPO, invest in making a standalone Convolution reverb plug-in, or provide groups of instrument patches in an a la carte fashion? To best answer these and other questions, our plan is to reach out to you.

Through user surveys and other market research, we plan to find out what you like about our existing libraries. Perhaps more importantly, we’re also interested in what kinds of tasks you wish you had a better solution for. I believe there’s a great opportunity for discovery in an industry that has reached maturity.

Even with all the changes in the digital music universe, our mandate remains clear: provide a reliable, simple, and affordable virtual instrument experience for music creators. It’s a vision that guides all the work we do and assures me that we’re making something that matters.

Jon TschiggfrieJon Tschiggfrie was once described by a professor of philosophy (rather hilariously in error) as “a cat who could really cut a rug.” Despite his ineptitude on the dance-floor, Jon managed to complete a vocal and classroom music degree and in 2011 joined the MakeMusic team.

Since moving to Colorado, Jon has continued pursuing his interests in choral composition and preserving the American steam calliope tradition (no, seriously, check out the photo above).

“Timbre” Feature in the Garritan CFX Lite and CFX Concert Grand


The “Timbre” Feature in the Garritan CFX Lite and CFX Concert Grand

Captured in historic Studio One at Abbey Road Studios, the CFX Lite is a robust subset of the full, glorious CFX Concert Grand piano (compare both products here). Upon its release, the CFX Lite had some additional features and benefits that were not included in the initial CFX Concert Grand release. (This has subsequently been addressed in a free-of-charge update, details of which can be found here). Among these new additions was a somewhat mysteriously named “Timbre” feature, which I’ll address after a brief side trip back to 1960s London.

George Martin and the Beatles

The collaboration of producer George Martin and the Beatles played a major role not only in the history of Abbey Road Studios, but also in the history of recorded music. The music they created was infused with many unusual sounds, new to radio listeners, that were the product of experimentation with technology. These included tape loops, feedback, automatic double-tracking, tape reversal, and more.

While in most cases these weren’t techniques that no one had attempted before, the Beatles team embraced them, executed them really well, and brought them to popular music. Let’s look at one more technique they made good use of: the manipulation of tape speed.

Tape Speed

There are several examples of Geroge Martin recording Beatle tracks at one speed and playing them back at another. Some of these experiments appear to have had different motivations than others.

In the case of “Strawberry Fields Forever,” Martin was faced with the impossible task of joining up two different takes, in different tempos AND keys, into one song. In my opinion, the level of success Martin achieved in “Strawberry Fields” owes equally to his genius and amazing luck (or divine intervention). For anyone else, on any other song, changing the tape speed to correct the tempo would not have magically solved the issue of two different keys. But I digress.

On “Rain” the tape speed was also altered but not, apparently, to solve a tempo or pitch problem. Both vocals and backing tracks were recorded with the tape machine running faster and then slowed down in playback to achieve a heavier, trance-inducing effect.

Similarly in “Penny Lane,” several instruments were speeded up on playback, including piano. While the end result is very different than in “Rain,” both experiments contribute to a subtle sense that something is slightly different; perfect for the consciousness-expanding mindset of the times.

In My Life

For “In My Life,” tape speed manipulation BOTH solved a performance problem AND created a memorable sonic effect. By October 18, 1965, the song was almost complete except for the bridge. Reputedly Lennon asked Martin to contribute a piano solo, suggesting “something Baroque-sounding.” In the course of the next four days, Martin had dutifully worked up the Bach-inspired piece we all recognize, but experienced difficulty playing it up to tempo.

To compensate, he performed the solo at half speed, and his performance was recorded with the tape machine running at half speed. When the resulting tape is played back at regular speed, the solo is heard in sync with the other tracks, at full tempo. It also sounds an octave higher than played.

Not only was the pitch and tempo impacted, but the timbre had changed dramatically as well. In fact, many people have mistaken the track for a harpsichord, which masterfully suggests a “Baroque” connotation.

The Garritan Timbre Effect

The timbre effect in the Garritan piano products allows you to achieve similar results, without a cantankerous tape machine (or white coated lab assistants to operate it). Turning the knob up (or clockwise), produces what I call the “In My Life” effect. The timbre sounds like a tape of a piano that has been increased in speed (but conveniently, without the increase of pitch).

Turning the knob counter-clock produces the opposite effect, creating a darker, warmer, mellower sound.

Examples

Check out these examples to hear the difference:


  • “Timbre Knob +50” is with the knob turned clockwise
  • “Timbre Knob 0” is the unaltered setting you’d get with the knob straight up at twelve o-clock.
  • “Timbre Knob -50” is with the knob turned counter-clockwise

Again, note that thanks to the dual miracles of programmers and the technology of zeros and ones, the pitch doesn’t change as you turn the knob, only the timbre (hence the name).

Your Turn

I hope you enjoy exploring the timbre effect, and the other powerful controls included in both of Garritan’s piano products. What’s more, I hope you find ways to use these tools that the Garritan developers never thought ofto take things a little furtherand thus carry on the tradition of sonic experimentation.

Share your results, questions or comments with other Garritan users on Facebook and Twitter.

In addition to being MakeMusic’s content manager, Scott Yoho is the leader of the Auto Body Experience, a horn-driven septet that plays his quirky music. He’s also a big Beatles fan.

A graduate of the Musicians’ Institute, he earned a B.A. in English from the University of Minnesota. Yoho played guitar with Rock and Roll Hall of Fame member Gene Pitney for ten years and has performed on stages as diverse as hay wagons, VFW basement floors, and Carnegie Hall.

Scott’s recordings have been featured in music magazines including Guitar Player, Vintage Guitar, and Keyboard, and he was once interviewed by NPR’s Terry Gross on Fresh Air.

Introducing the Garritan Abbey Road Studios CFX Lite


Introducing the Garritan Abbey Road Studios CFX Lite

The CFX Concert Grand

In 2014 we released the most detailed and advanced Garritan project ever: the CFX Concert Grand. It began with Yamaha’s remarkable nine foot concert piano, the development of which took more than 18 years. We placed this no-holds-barred instrument in the most legendary recording space in the world: Studio One at Abbey Road Studios. Once there, world-class engineers used the most regarded mics and outboard gear to capture the magic.

The resulting CFX Concert Grand set new standards for virtual pianos.

The CFX Lite

Today we’re carrying on the Garritan tradition of democratizing music making by releasing the CFX Lite, a downloadable subset of the full CFX that is more affordable, portable, and is compatible with more modest computer systems.

“When we set out to make a more accessible version of the CFX Concert Grand, we didn’t want it to be ‘watered-down’ in any way,” said Fred Flowerday, MakeMusic senior vice president of product strategy. “Instead of making any compromise in sonic quality, we provided a single, classic microphone perspective in all of its richness and depth.”

Where the full CFX offers close and ambient mic placement for three perspectives (Classic, Contemporary, and Player), CFX Lite offers simply the close-mic’d Classic perspective, provided in all of its full-bandwidth, remarkable grandeur. The CFX Lite includes all 20 layers of detail from the original. This includes separate sample sets for pedals-up, sustain pedal down and soft pedaling.

Perspectives

Not sure what we mean by the three perspectives? These are a combination of mics and mic placement designed to create a specific result.

  • Classic – most faithfully captures the natural tonal character, clarity and nuance of the CFX
  • Contemporary – bright and hard with lots of attack from the hammers, while maintaining warmth with intimate ambience
  • Player – offers the experience of playing the CFX in Studio One, particularly when used with headphones

Also, each perspective also offers close and ambient mics. For the CFX Lite, we used the close mics of the Classic perspective.

“I really love the Lite version of the Abbey Road CFX,” said Mirek Stiles, head of audio products at Abbey Road Studios. “It’s great having the Abbey Road engineers’ favourite mic array from the original CFX release, with the same beautiful tones of the CFX in the most famous recording studio in the world, but in a more accessible, downloadable package.”

The CFX Lite also adds new features not found in the original CFX Concert Grand. These include partial and re-pedaling functionality and 20 additional impulses captured from Abbey Road Studios’ legendary outboard reverb equipment. Also newly added is a Timbre effect that simulates the change in tone that occurs when instruments are recorded at one tape speed and played back at another. Today these enhancements are also available to owners of the full CFX too, via this free-of-charge download for Mac and Windows.

But enough talk. To really get a sense of what the CFX Lite offers, you have to hear it. 

Hear the CFX Lite in action

[soundcloud url=”https://api.soundcloud.com/playlists/273741244?secret_token=s-UE5X1″ params=”auto_play=false&hide_related=false&visual=false” width=”100%” height=”450″ iframe=”true” /]

clear

Best of all, you can own the CFX Lite today for only $79.95!

buy nowLearn More

Additional Strings in Garritan Personal Orchestra 5


additional-strings-in-garritan-personal-orchestra-5

As a string player I am most excited about the new strings in Garritan Personal Orchestra 5 (GPO 5). With multiple bowing samples for each instrument, a fluid live-friendly playback engine, and the choice between individual, chamber and section string sounds, GPO 5 has a lot to offer those of us who focus on strings.

Take a Bow

Bowing is too often overlooked in orchestral sound libraries. There’s a noticeable sonic difference between the many techniques a string player uses performing. Listen to the differences in this short example:

[soundcloud url=”https://api.soundcloud.com/tracks/289362344?secret_token=s-E0U3z” params=”auto_play=false&hide_related=false&show_comments=true&show_user=true&show_reposts=false&visual=true” width=”90%” height=”100″ iframe=”true” /]


What you’re hearing is a violin playing a major scale – first as slow, sustained notes, followed by martellato, spiccato, staccato, and finally col legno. Notice how each technique has its own unique articulation and tone. Many composers use these bowing techniques in their scores, but can’t always use them in their MIDI demos. Thankfully, GPO 5 delivers these without the hassle of huge load times or an over-complicated interface.

While on the topic of ease-of-use, let’s take a look at how I created this sample.

An Instrument of Change(s)

One of my favorite things about the GPO product line is how natural it feels to play on a MIDI keyboard. GPO 5 is no exception. Using a combination of low-octave key-switches and control change messages, writers and performers alike can evoke a huge range of tonal colors.

I created the previous scale example by simply playing a major scale multiple times, and using keys in an octave below the instrument’s range to choose a new bowing technique. That’s it! No loading new samples, no switching between multiple channels and tracks. In a word – no fuss.

additional-strings-in-garritan-personal-orchestra-5-keyswitches-2

As you can see in the image above, the red keys on the ARIA player’s on-screen keyboard represent available key switches, and if I press one of these keys while playing, it will highlight yellow. This makes it really easy to use multiple sounds at the same time, even while playing live. To my fingers, using a MIDI keyboard feels similar to using preset keys on a Hammond organ.

Control change messages are also a common way to change the sound of the instrument you’re playing. These are usually controlled by programmable knobs and faders on the face of the keyboard as well as by your keyboard’s pedals. These messages can control volume, pitch, tone as well as additional techniques like flutter-tonguing and keyboard pedaling. With Orchestral Strings however, these controls are a little simpler. You have basic envelope controls (known as ADSR), a tone control, and my favorite feature: legato controls, including automatic legato.

Legato and Automatic Legato

How do the legato features work? In the Orchestral Strings patches your keyboard’s sustain pedal can be used to restrict the instrument to only one note. When you play another note, the instrument seamlessly moves to that new note with a legato effect. This makes it very easy to simulate slurs and slides on the fly, even while playing a keyboard in a live setting. Automatic legato is a setting which causes GPO 5 to automatically press the pedal for you.

Go Big or… Go Small

Suppose you’re writing a beautiful piece for a small ensemble. While working, you decide you want the closer, more personal effect of a chamber ensemble but your string samples sound like a full-blown symphony. Normally this would leave you with a tough compromise – until now.

GPO 5 includes full instrumentation for solo instruments, as well as both large and small string sections. This makes it easy to move from small quartet to big Sinatra-style string sections, and everywhere in between.

In this example, I’ve started with a basic string quartet, built into a small sectional, and finish with a full orchestra.

[soundcloud url=”https://api.soundcloud.com/tracks/289785955?secret_token=s-xf4dX” params=”auto_play=false&hide_related=false&show_comments=true&show_user=true&show_reposts=false&visual=true” width=”100%” height=”100″ iframe=”true” /]

Add It All Together – One Piece at a Time

A common technique in making MIDI mock-ups is to layer string patches with individual samples as well. It takes up a few extra spaces in the ARIA Player, but I think you’ll find the end result to be very rewarding. Here’s one of my favorite compositions from Antonin Dvorak, played by the Garritan Personal Orchestra:

[soundcloud url=”https://api.soundcloud.com/tracks/289368932?secret_token=s-2XujB” params=”auto_play=false&hide_related=false&show_comments=true&show_user=true&show_reposts=false&visual=true” width=”100%” height=”100″ iframe=”true” /]


I hope you’ve enjoyed this brief tour of some of the string features that I find most interesting in GPO 5. If you’d like to hear more of this library, be sure to check out the audio samples on the GPO 5 audio demos page.

Peter FlomPeter Flom is the Production Manager of Repertoire Development at MakeMusic. A graduate of the Berklee College of Music, Peter has previously worked at KMA Studios in New York City, and in MakeMusic’s Customer Support department. He now spends most of his days developing new content for Finale and SmartMusic.

Peter is also a freelance arranger and engraver, and plays a mean guitar when nobody’s watching.

A Beginner’s Guide to Using Garritan Libraries with Cubase


A Beginner’s Guide to Using Garritan Libraries with Cubase (1)

The world of digital audio workstations (DAWs) can be a bit intimidating for newcomers. With a seemingly infinite number to choose from, it can be difficult to even know where to start. Today I’ll share some tips to help you get started using a Garritan library with my favorite DAW, Cubase.

There’s no shortage of DAWs out there, with their own unique workflows and layouts. I would highly recommend trying a few out for yourself to see which one fits you best. As someone who does a lot of production work, Cubase is a great option for me.  It offers a wealth of creative tools that you won’t necessarily find in more recording-oriented programs like Pro Tools or Logic. Although I’ll be covering Cubase in this article, many of the concepts can be applied to any DAW.

Setting Up a Garritan Instrument

To get started, we’ll first need to open an instance of a Garritan library in Cubase. With a new Cubase project open, go to Devices > VST Instruments and select the Garritan library from the Instrument menu – in this case I’ve selected the CFX Concert Grand.

A Beginner’s Guide to Using Garritan Libraries with Cubase (2)

Click Add Track and the CFX Player will display along with a new MIDI track ready to record the selected Garritan instrument.

A Beginner’s Guide to Using Garritan Libraries with Cubase (3)

Recording, Entering and Editing MIDI

Click the record and and play buttons from the transport at the top of the screen. A new MIDI track will record your performance from the ARIA Player.

A Beginner’s Guide to Using Garritan Libraries with Cubase (4)

If, like me, you’re not much of a pianist, you can also import a MIDI file to be played back by your Garritan library.  To do so, simply drag the MIDI file onto the empty track.

Once you’ve recorded your performance, or imported a MIDI file, you can easily quantize playback or customize individual notes. To access the quantization settings, select the track by clicking on it and go to Edit > Quantize Panel. Finale users should be familiar with most of the settings here. Select the smallest note value from your performance and click Quantize.

A Beginner’s Guide to Using Garritan Libraries with Cubase (5)

You can also edit each note pitch, length and key velocity by opening the Key Editor from the Edit menu. This can be helpful to quickly correct a wrong note or change the dynamics of a single note or section.

A Beginner’s Guide to Using Garritan Libraries with Cubase (6)

Using Audio Effects

Although Cubase offers many tools to edit MIDI, where the program really shines is the large library of audio effects. We can take advantage of these with our Garritan track by first bouncing it to audio. This is easily done. Open the File menu and choose to Export > Audio Mixdown. Next, select the Garritan library from the left menu to make sure that we’re not bouncing the entire project. Under Import into Project, select Audio Track to ensure that the exported audio file is added to a new track in your project.

A Beginner’s Guide to Using Garritan Libraries with Cubase (7)

Once you’ve exported the track to audio, you’ll have access to all of Cubase’s audio effects. Select the new audio track and click Inserts from the Inspector. Click one of the open spaces to see all available effects. Once you select an effect, its control window will appear. Here you can select a preset, or dig a bit deeper and experiment with each parameter.

(For time-based effects (reverb, delay, etc.) it’s generally preferable to use Sends, rather than Inserts. This will preserve the integrity of the original track and give an extra level of control in the mixer.)

A Beginner’s Guide to Using Garritan Libraries with Cubase (8)

Hopefully, this basic guide will help to give you a starting point and the confidence to jump into Cubase (or your DAW of choice) and start experimenting. The best way to learn any DAW is to simply spend some time with it and start exploring each feature. Once you have your basic file started following the steps above, I’d recommend hitting Save As, giving the file a new name and just having fun trying everything out for yourself. This way you can always return to your starting point and experiment some more.

Jon CielinskiJon Cielinski joined MakeMusic’s technical support department in 2011. Today he’s a SmartMusic product specialist, answering SmartMusic questions for MakeMusic employees (including assisting customer support representatives) and collaborating with developers on future versions of SmartMusic.

Jon also works as a music producer and recording engineer. When not on the job he enjoys exploring the trails around Boulder and taking in local shows.


Choir Tips in Garritan Personal Orchestra 5


gpo-5-v3

I’m really excited about the new choir sounds in Garritan Personal Orchestra 5 (GPO 5). In the past I’d typically write choral music on the piano (because I didn’t have access to a lot of vocal samples), so these additions are really welcome. 

GPO 5 breaks the choir down into Soprano, Alto, Tenor, and Bass, and adds a Boys Choir, Children’s Choir, and a Full Choir. Every choir patch also includes additional controls and keyswitches. Plus, the new ARIA Player interface makes it quicker and easier to select the sound you want. Rather than navigating tricky submenus with a shaky mouse, you simply choose the sound you want from a list:

garritan-2

Today I’d like to share some tips to help you get started with these new choir sounds.

Keyswitches

Keyswitches turn specific keys on your MIDI keyboard into on/off switches. In Garritan products you press a keyswitch to change between different sounds from within the same loaded patch. Typically keyswitches are placed at the bottom of the MIDI keyboard beyond the pitch range of the loaded patch.

Check out the ARIA Player screenshot at the top of this post. Look for the two keyswitches, which allow you to choose between Ohs and Aahs in the Full Choir. The Ahs keyswitch is selected (indicated by the peach color) while the Ohs key is not (it’s pink). Press either key and it will stay selected until another keyswitch is pressed; there is no need to hold a keyswitch down. Note that the Children’s Choir and Boys Choir also include a third keyswitch for an “Eeh” sound, and that Sopranos also have a Solo NV (No Vibrato) and Solo Vibrato sound.

Directing Your Choir

The new choir patches respond well to traditional velocity data from MIDI keyboards, but I find the choir works best with the ARIA Player’s mod wheel-volume configuration. If you’re new to this, no worries. You don’t need to need to configure anything to make your mod wheel functionit just works. Every mod wheel transmits a very specific piece of data called CC1, the on screen mod wheel will automatically receive this CC1 data.  

Additionally, you are given full Attack, Decay, Sustain, Release (ADSR envelope) controls, which can be  automated. With the ADSR section, you’ll be able to shape how your choir sings their oohs and ahs. For instance, if you want your choir to sound more staccato, leave the Attack, Decay, Sustain, and Release values at 0. If you want the choir to sound more dramatic, set Decay and Sustain to 100, and increase the Attack and Release.

If you increase the Attack too much, your choir will always begin too late. Also, if you increase the Release too much, you’ll wait longer for the choir to stop singing. I like to think of Release as a natural reverb. While the look of these knobs and wheels may be a bit intimidating at first, a little experimentation will reap big benefits. You’ll get the hang of it in no time.

One of the most important things to take away is that the Mod Wheel and ADSR controls are completely independent of each other. The former is strictly volume and the latter is an envelope for shaping a sound.

Additional Controls

While volume and envelope controls play a major part of any sampler or synthesizer, there are other controls that are less common but can also be found on many other samplers and synthesizers.

  • Auto-Legato is an on/off switch that makes your choir sing the following note on the same breath (monophonic per patch).
  • The Offset knob controls the amount of delay that occurs between when each note begins and when when you hear the corresponding sound.
  • Porta (portamento) is an interesting parameter, allowing one note to slide into another. With Porta set to 100, the note you are holding down will slide up or down to , the next note you play. Auto-Legato must be enabled for Porta to have an effect.
  • The Tone knob is a low-pass filter. At a low value, you will hear only low frequencies; increasing the value will add back progressively higher frequencies.

If you don’t already own GPO 5, expanded choirs and controls are not the only highlights. There are many new features as well as a host of additional sounds; check out these audio demos. GPO 5 is now available for $149 directly through MakeMusic or via your favorite music retailer.

I find myself using GPO 5 more and more in my own music projects, and you probably will too. I hope these tips inspire you to experiment with the choir (and other) sounds in GPO 5.

Nick MorrisNick Morris is part of the MakeMusic Customer Success team, originally from Minnesota and now relocated to Colorado. He graduated from McNally Smith College of Music, receiving his B.S. in Music Production.

Nick enjoys finding new music to listen to and designing sound patches in his free time.


This website uses cookies to improve your experience. By viewing or browsing our site, you are agreeing to our use of cookies. Read our Privacy Policy for more information.

Accept