


In a DAW, Human Playback equals Mix Automation
Creating a compelling performance with MIDI data in a DAW depends on the manipulation of Continuous Controller Data (“CC”) and MIDI Key Switches (“KS”) for dynamics and articulation. In Finale, this data is created automatically from score markings when Human Playback is turned on.
The conventional wisdom regarding Human Playback CC data has been to turn it off for export to a DAW. The disadvantage of this approach is that all this humanizing data is lost, and the score won’t sound like you wrote it. In order to replicate the advantages of Human Playback using a “clean” MIDI file in Logic, editors would need to spend hours editing CC data in their tracks, creating Mix Automation from scratch.
Finale’s Human Playback (“HP”) will work beautifully in Logic Pro X after following 3 basic steps:
- Export MIDI from Finale (with HP on)
- Load ARIA Player into Logic Pro X as a MultiTimbral Instrument
- Create a “Track Stack” in Logic Pro X for each part.
Using the ARIA Player offers the potential to take full advantage of the CC data created by Finale’s Human Playback, potentially saving hours of editing.
This approach automates the creation of a good performance of the MIDI data in Logic, saving a lot of editing during the production phase of the project.
How To Set up the Garritan ARIA Player in Logic Pro X
The following video walks you through setting up the ARIA Player (included in all Garritan Libraries) in Logic Pro X. I hope the video will be helpful, not only to Finale users, but also to Garritan users in general.
The Process in Brief without the Video
Below, I’ve duplicated the high points of the video for those of you who prefer having a list.
1. Saving Your Banks in Finale
- To save your ARIA Player Banks, go to MIDI/Audio>Audio Units Banks. From here click on the edit icon (it looks like a pencil) next to the bank you wish to edit.
- With ARIA Player open, click the down arrow near “Ensemble” (top right).
- Save the ensemble into your user folder. This creates a “Multi,” a multi-timbral instrument that can be instantiated in Logic Pro X.

2. Getting Started In Logic Pro X
Open a Session. Logic prompts you to add a track before you can get in your session.

3. Loading an Instrument into Logic
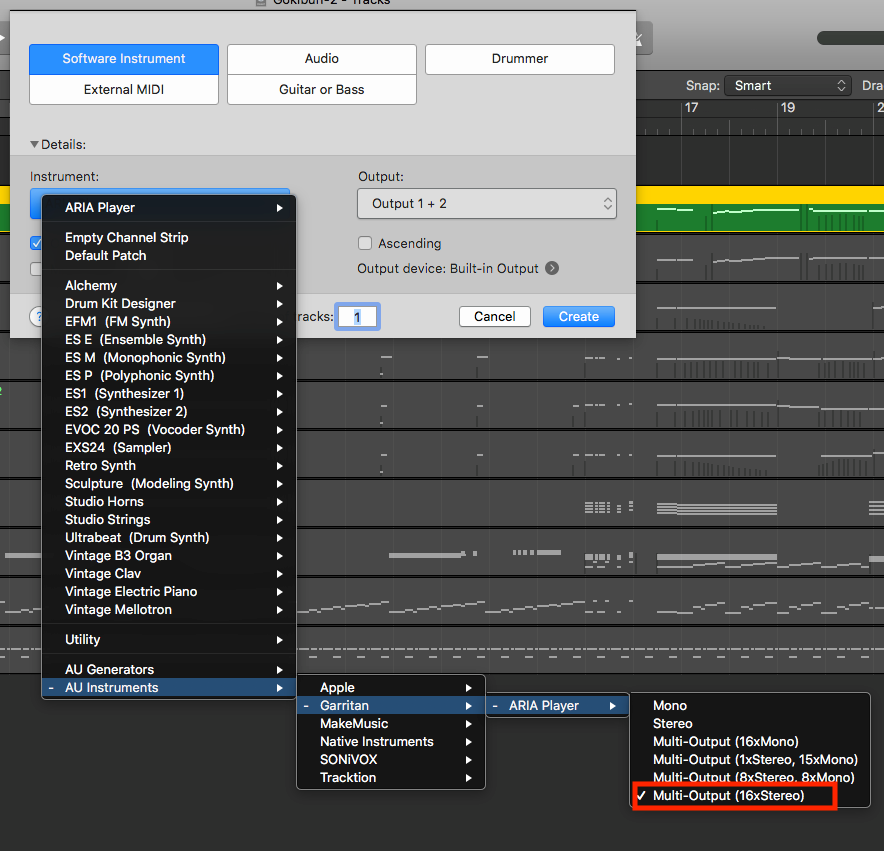
In the New Track dialog, select “Software Instrument,” then add the ARIA Player via the drop-down under “Instrument”
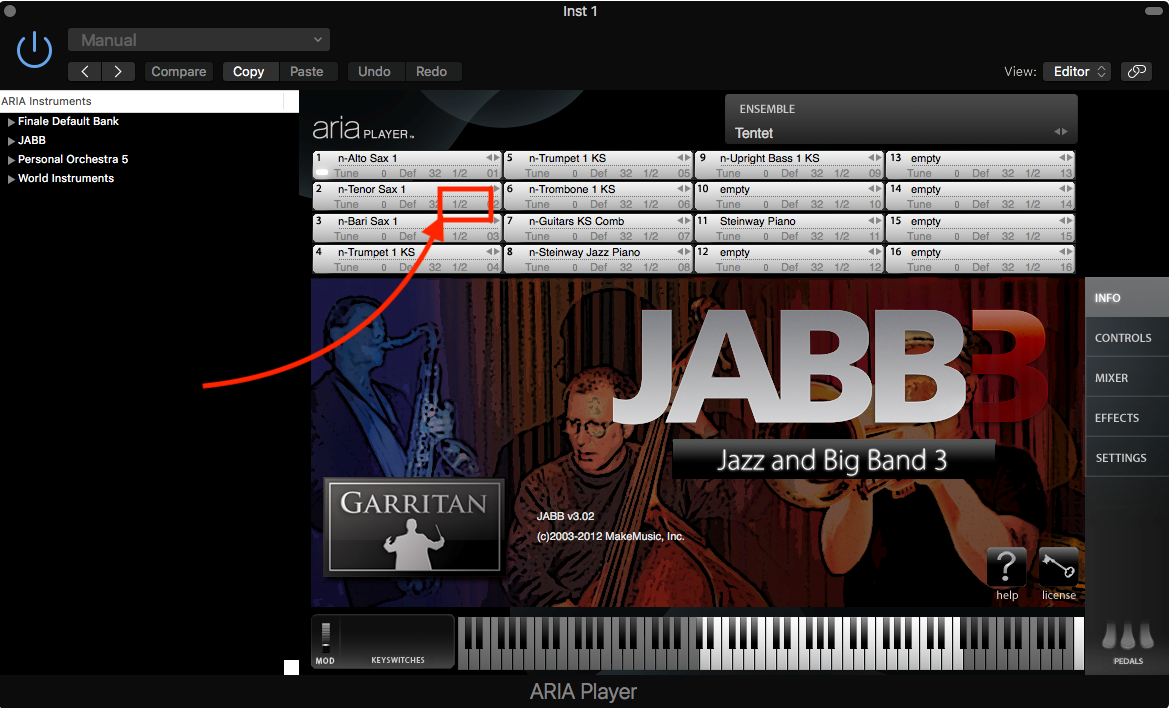
The Aria Player will open.
Next, load your saved Multi – and make sure your parts’ audio track routing channel assignments are distributed: 1&2, 3&4, 5&6, etc.
When using the ARIA Player as a multi in a DAW, in order to get full control over the mix, audio channel outs need to be reassigned from the default out 1&2 main stereo output.

The first track you see in the Arrange view is the “master instance,” an instrument track hosting the player. You’ll see additional Aux tracks that will host your MIDI data. Name the tracks, corresponding to the parts in the multi you just loaded.
4. Import MIDI
At this point, import your MIDI. It will load into a series of new instrument tracks in the Arrange window. Select all your MIDI tracks and drag them up to the Auxes. After doing that, delete all the instrument tracks created during MIDI import.
Now you have a separate Aux track containing your MIDI data for each MIDI channel, with your MIDI track data routed to its corresponding channel on the ARIA player, and receiving audio from the ARIA Player on a discrete audio pair. This takes care of MIDI–out, Audio–in for your MIDI tracks.
At this point, you’ll be able to bounce each part to an audio track, and go on mixing from there. But if you want to be able to edit or add to your MIDI once it’s in Logic (with full mix control before you bounce any audio), there’s more to be done.
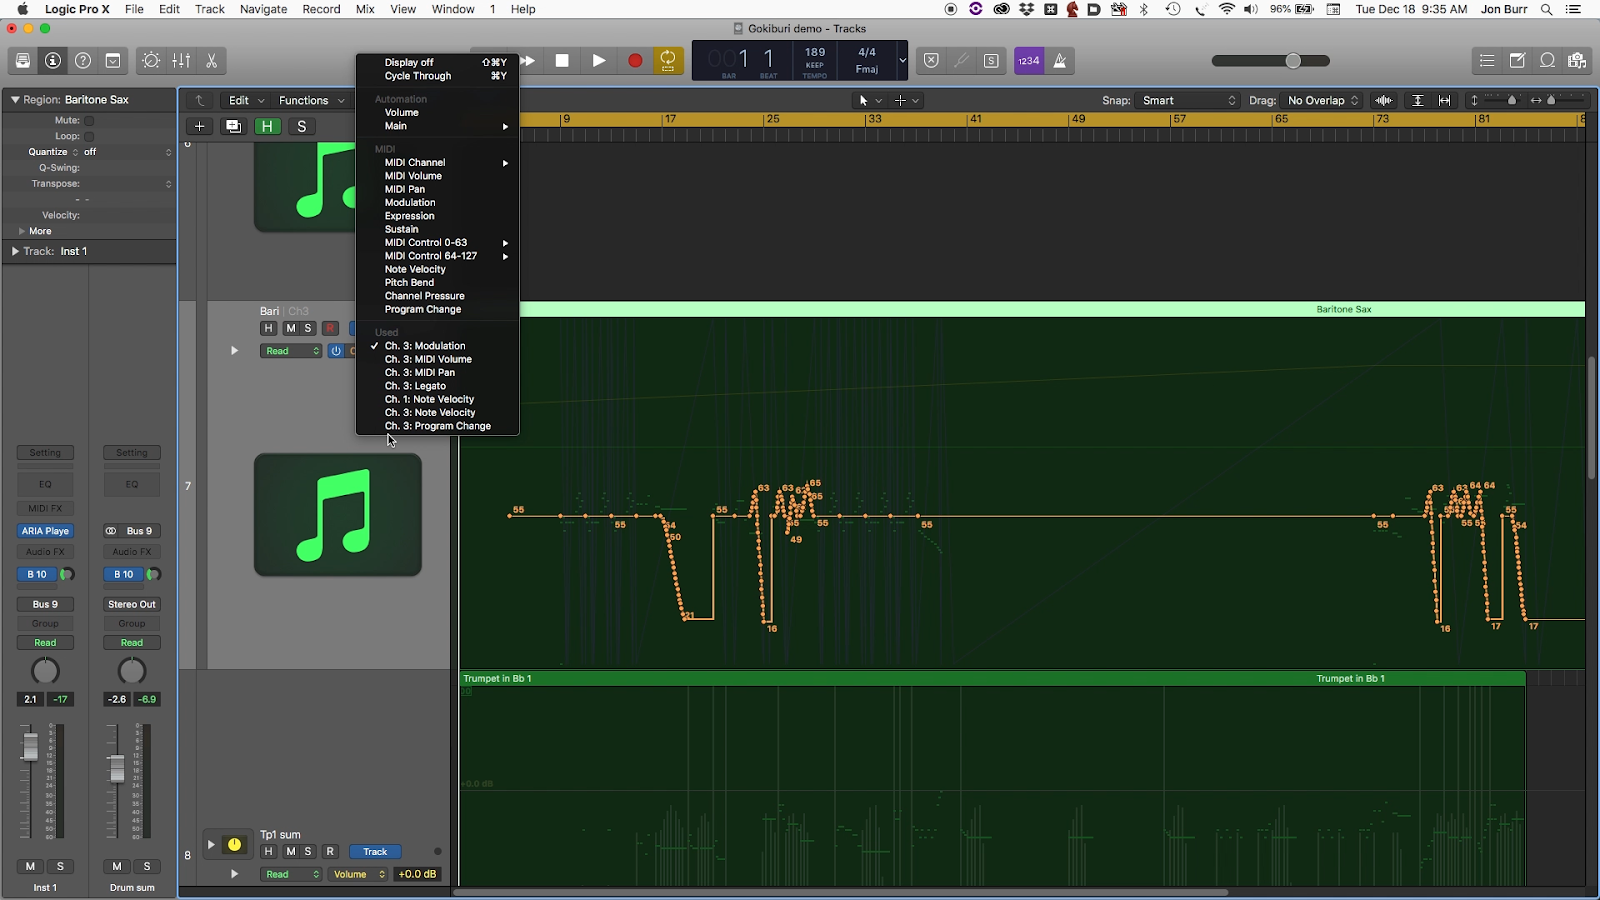
After importing your midi, you can see what Human Playback adds to the file. Aside from writing MIDI volume and pan information, it also writes automation in seven CC Automation Lanes, plus Key Switches to change samples for articulation changes.
Here’s a view of Modulation CC data as written by Human Playback, following score markings.
5. Making Each Track Independent
You may have noticed that the track solo buttons currently kill playback. It appears at first you can’t solo a track (unless you already know about the Region Solo and Mute functions in Logic Pro X). Why?
The answer is that track buttons work on audio only. Remember that all the audio for all these aux tracks is coming from the first (instrument) track only. We don’t need “Track Solo” – we need “Region Solo.”
There’s a toolbar icon for Region Solo (but not Region Mute). The easiest way to solo and mute at this stage of the game is to select the region and select “Control–s” (Solo) or “Control–m” (Mute).

6. Bouncing Tracks
To render your Finale output as audio, Region–Solo a track, then right-click the region, and select “Bounce In Place.” If you’re going to use the MIDI again for another instrument, select “Leave” – and the other options as shown:

At this point, you might not have any effects on – which is good when you’re bouncing audio this early in a session. There is more to be done.
7. Enabling Full Mix Control for the Multi
Now we need to create an additional set of Aux tracks to enable us to mix and process the audio for each track coming from the ARIA Player. Logic Pro X automates the creation of these aux pairs, and enables them to be joined in a Track Stack.
8. Open your Mix Window
Next open your Mix window and create Channel Strips for the parts in the Multi by clicking “+” in the first instrument track.

Continue until you have a Channel Strip for each Part,
Then name your newly created Channel Strips.
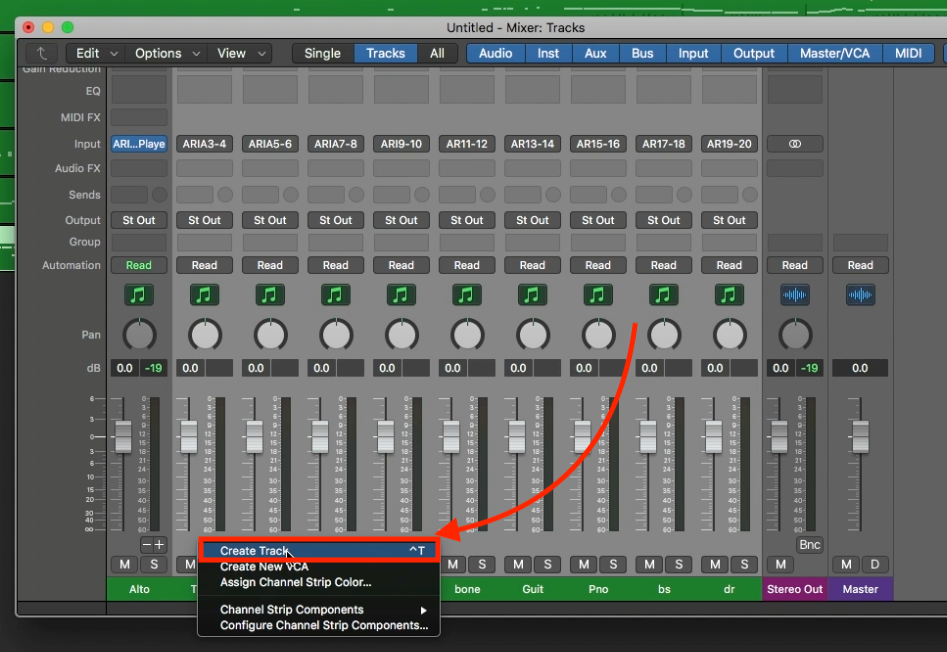
9. Create Tracks and Automate Bus Routing
Select all the strips you just created, then right-click to Create Tracks, which will show up in the Arrange window. Now you’ll have a pair of aux tracks for each part.
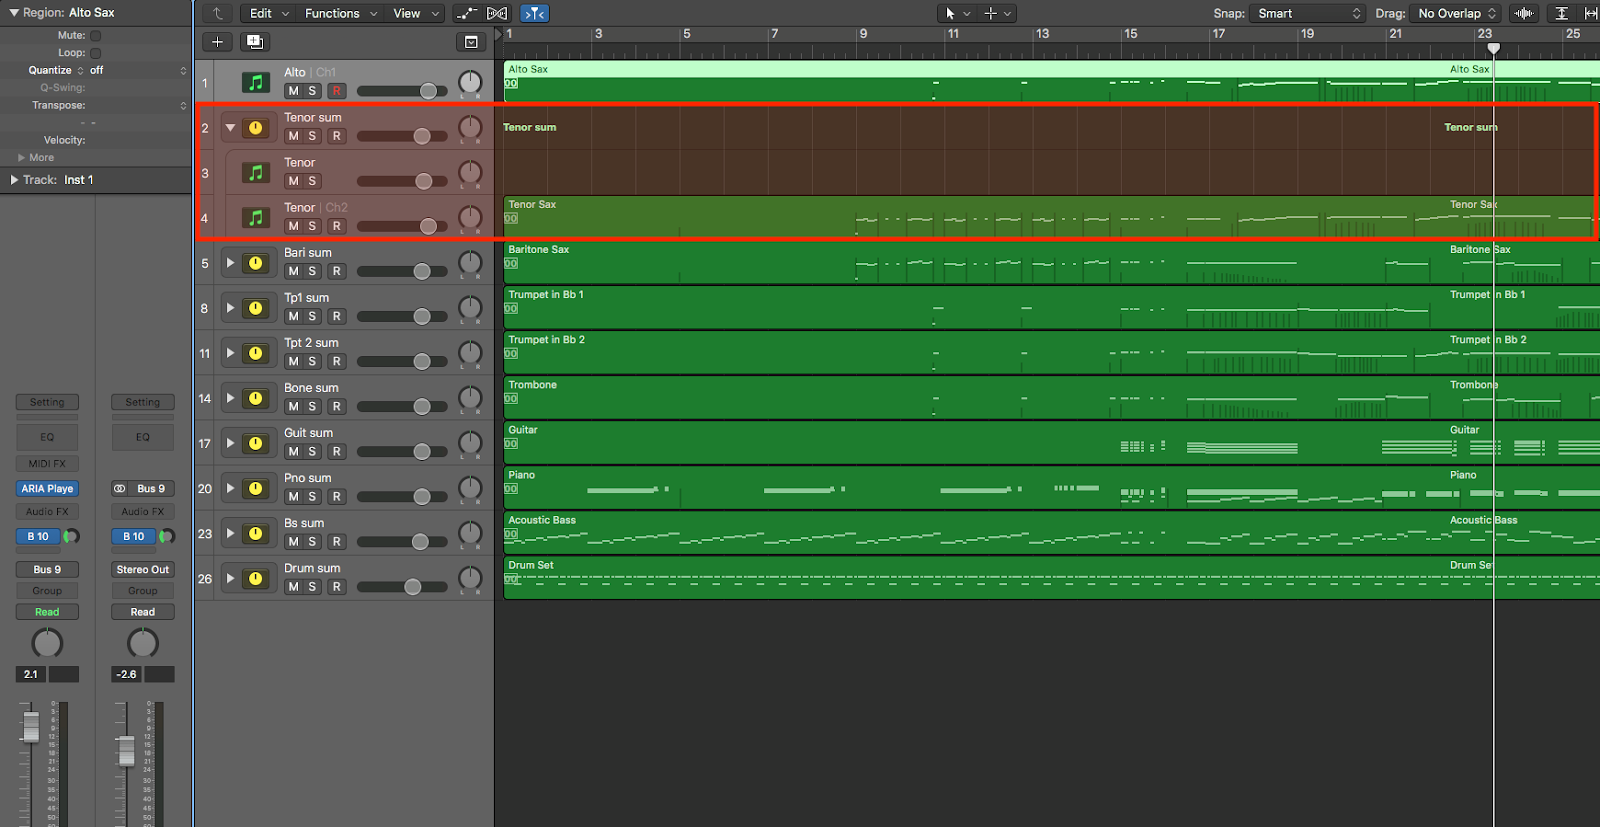
Finally, arrange your tracks so pairs are together. Select an instrument pair, right–click and select “Create Track Stack.” This step creates bus routing for the auxes – it’s essential for the signal flow to work. You’ll have 3 items visible in the Arrange window for each part:
For mixing, selecting “Single” view presents a set of controls that work for mixing in every track.
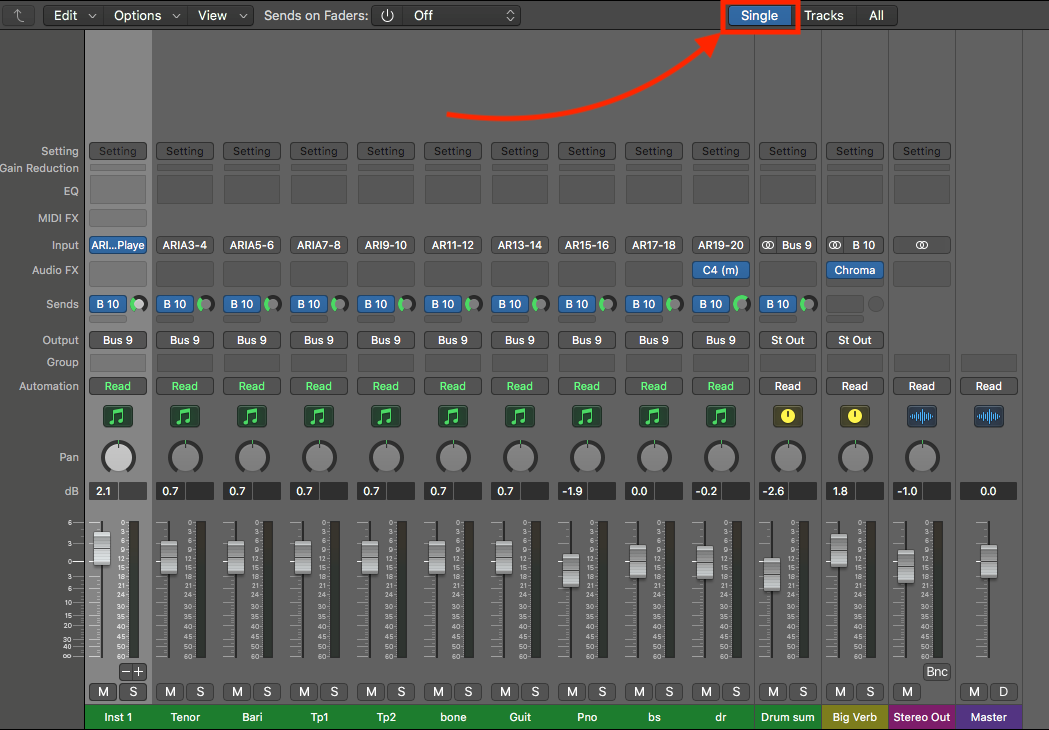
And that’s it. Now you’re ready for mixing.
 Jon Burr is a composer, arranger, producer, recording engineer, bandleader, bassist, and educator from Yonkers, NY and a Finale user since 1996. As owner/operator of Arranger for Hire, he serves music arranging and production customers from around the world. A veteran touring bassist, his performance credits include Tony Bennett, Buddy Rich, Stan Getz, Chet Baker, Eartha Kitt, Rita Moreno, The Hot Swing Trio, Stephane Grappelli, and many others. Arranging customers have included the Mel Lewis Jazz Orchestra, Chilean Astronomy Society, The Milpitas Community Concert Band, The Honey Taps, The Montclair Kimberly Academy’s annual musical, The MCoE Concert Band at Ft. Benning, Symphonia Phonotone, and many others. He writes for and leads his own ensembles, including the Jon Burr Quintet. His arrangements for Swedish YouTube artist Kim Andersson have received over 5 million Facebook views.


