

If you own a Garritan sound library (including the one that comes with Finale), and are new to Ableton Live 9, this post is for you. We’ll share some tips to help you get started in Live with the ARIA Player you have, regardless of whether you own Live or are using the free trial. In addition to getting everything set up for use, we’ll also address a little more advanced workflow with some ideas for routing.
1. Activating VST/AU Plugins
If you’ve used a DAW before, your plugins are likely already active for you. You will, however, need to enable your plugins inside Live 9 before you get started.
NOTE: The screenshots below were taken on a Mac. Don’t fear, Windows users, everything will be mostly in the same place. Also, I’ve changed the color of the software (kind of a cool feature in Live) so don’t be put off if Live looks a little different on your machine.
On Mac, go to Live > Preferences. Click on the File Folder, and then turn on Audio Units. You might turn on the other options if you have other VST plug-ins. Again, Windows will look a little different (you’ll want to go to Options > Preferences), but this is the general idea.

2. Selecting the ARIA Player
Now that Live has the ability to use 3rd-party plug-ins, it’s time to use them.
If you don’t already have a MIDI track created inside Live, you’ll need to create one.
Go to Create > Insert MIDI Track. If you’re used to a more traditional DAW view, select the Arrangement View. To do so, click the button with three horizontal lines, like this:
![]()
This is what a track looks like in Arrangement View:
To load the ARIA Player, select this newly created MIDI track (to do so, you can click just about anywhere), then look to the left side of Live. Under categories, select Plug-ins, then in the Garritan folder, select the ARIA Player.

Your MIDI track will automatically rename itself to your selected plug-in. You’ll notice the ARIA Player has come on screen, and there is now an ARIA Player box in the lower left corner of the screen – as seen below:
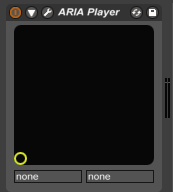
TIP: If, like me, you inadvertently close the ARIA Player, and want to reopen it, click the wrench icon on the box above.
Now that the ARIA Player is loaded, it’s time to load your instruments and rout them.
3. Routing ARIA Channels into Live
If you’ve used other DAWs like ProTools or Logic, you may have noticed that the ARIA Player offers several variations of output configurations (Mono, Stereo, and few different Multi-Output options). In Live, the only option available is Multi-Output 16 Stereo. Having a Multi-Output Plug-in is helpful for saving computer power — it makes more efficient use of resources than it would to load 16 different ARIA Players.
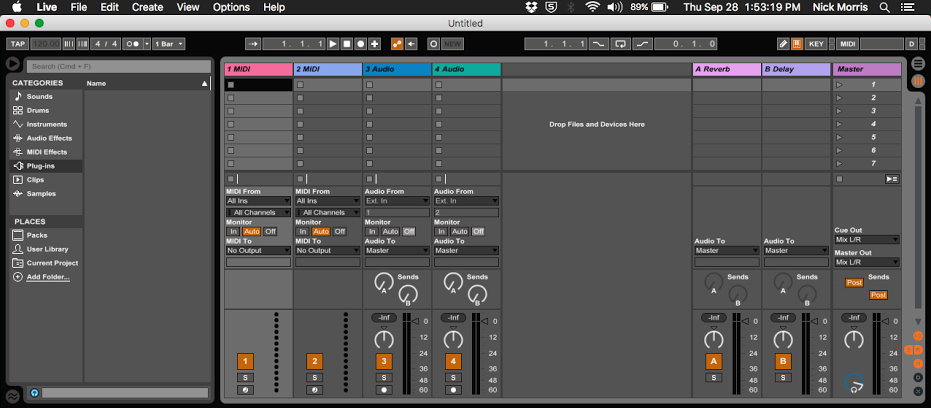
Within the ARIA Player, all sound is routed to outputs 1 and 2 by default. You can change this by clicking on the “1/2″ setting on each channel. In this example, I’ll be routing 4 stereo outputs.

Right now, the Flute is coming out from 1 and 2, the Tuba is coming out from 3 and 4, the Violin is coming out from 5 and 6, and the Shakuhachi is coming out from 7 and 8.
Now, how do we create new tracks for the tuba, violin, and shakuhachi? Luckily, Live is pretty smart and this process is easy. Start by creating three new audio tracks (Create > Insert Audio Track).
On the first of these three new audio tracks, select the “Ext. In” input and select 1- ARIA Player. You’ll notice the output sets itself to “Post Mixer.” Select 3/4 ARIA Player. (Your MIDI track with the ARIA Player automatically uses output 1/2).
On the next audio track, select the same input, 1- ARIA Player, and use the next stereo output, 5/6 ARIA Player. Continue this process and always select the next output. My results look like this:
4. Routing MIDI from Live 9 into the ARIA Player
Multiple outputs are great, but they don’t do you any good if you’re not using multiple inputs. You’ll want to send MIDI from Live into the ARIA Player. Again, Live is pretty smart, so this will be an easy process. In this example, I’ll show how to set up 4 inputs.
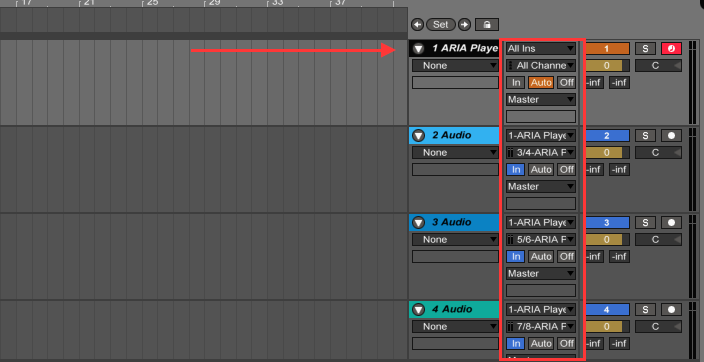
The good news is, you already have the first input ready go from the setup in step 2. Next, we’ll create 3 MIDI tracks to set up your additional inputs. (Create > Insert MIDI Track)
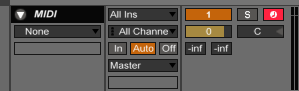
By default, a new MIDI track will look like this:
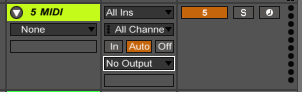
Below the In | Auto | Off section is our area of focus. Select “No Output” and select 1-ARIA Player. You’ll notice the box below has switched to “Track In”. Select “Track In” and select 2-ARIA Player. For the Next MIDI track, set “No Output” to 1-ARIA Player again, but set “Track In” to 3-ARIA Player. Continue this process and select the next ARIA Player input.
When ‘m done it looks like this:

Now you’ve successfully routed your MIDI ins and audio outs, so you are up and running with Garritan Sounds in Live. Please let us know how it’s working for you via Facebook or Twitter.
 Nick Morris is part of the MakeMusic Customer Success team, originally from Minnesota and now relocated to Colorado. He graduated from McNally Smith College of Music, receiving his B.S. in Music Production.
Nick enjoys finding new music to listen to and designing sound patches in his free time.


